Platypush

How to use the Platypush web extension to customize your browser and connect things together.

Author photo Platypush
.

Once upon a time, there was a worldwide web where web extensions were still new toys to play with and the major browsers that supported them (namely Firefox and Chrome) didn’t mind providing them with very wide access to their internals and APIs to do (more or less) whatever they pleased. The idea was that these browser add-ons/apps/extensions (the lines between these were still quite blurry at the time) could become a powerful way to run within a browser (even locally and without connecting to another website) any piece of software the user wanted to run.

It was an age when powerful extensions spawned that could also deeply change many things in the browser (like the now-defunct Vimperator that could completely redesign the UI of the browser to make it look and behave like vim), and user scripts were a powerful way users could leverage to run anything they liked wherever they liked. I used to use Vimperator custom scripts a lot to map whichever sequence of keys I wanted to whichever custom action I wanted — just modeled as plain JavaScript. And I used to use user scripts a lot, as well — those still exist, but with many more limitations than before.

That age of wild West of web extensions and apps is largely gone by now. It didn’t take long before malicious actors realized that the freedom given to web extensions made them a perfect vector to run malware/spyware directly within the browser that, in many cases, could bypass several anti-malware layers. And that generation of web extensions had another issue with fragmentation. Firefox and Chrome had developed their own APIs (like Mozilla’s XUL and Chrome Apps) that didn’t have much overlap. That made the task of developing a web extension that targeted multiple browsers a very expensive experience, and many extensions and apps were only available for a particular browser.

The case for greater security, separation of concerns, and less fragmentation drove the migration towards the modern WebExtension API. Around the end of 2017, both Mozilla and Google ended the support for the previous APIs in the respective browsers. They also added more restrictions for the add-ons and scripts not approved on their stores ( recent versions of Firefox only allow you to permanently install extensions published on the store) and added more constraints and checks in their review processes.

The new API has made it harder for malicious actors to hack a user through the browser, and it also has greatly reduced the barriers required to develop a cross-browser extension. On the other hand, however, it has also greatly reduced the degrees of freedom offered to extensions. Several extensions that required deep integration with the browser (like Vimperator and Postman) decided to either migrate to stand-alone apps or just abandon their efforts. And user scripts have become more niche geeky features with more limitations than before offered by third-party extensions like Greasemonkey/Tampermonkey. Firefox’s recent user-scripts API is a promising alternative for reviving the power of the past wave, but so far it’s only supported by Firefox.


As a power user, while I understand all the motivations that led browser developers to the decision of more fencing/sandboxing for the extensions, I still miss those times when we could deeply customize our browser and what it could do however we liked it. I built Platypush over the years to solve my need for endless extensibility and customization on the backend side, with everything provided by a uniform and coherent API and platform. I thought that applying the same philosophy to the context of my web browser would have been the natural next step. With the Platypush web extension, I’ve tried to build a solution for several needs faced by many power users.

First, we’ve got several backend solutions to run things around, and smart home devices to do things and pass information around. But the dear ol’ desktop web browser has often been left behind in this progress in automation, even if many people still spend a lot of time on the web through desktop devices. Most of the front-end solutions for cloud/home automation come through mobile apps. Some of the solutions for automation provide a web app/panel (and Platypush does it as well), but the web panel is receiving less and less attention in an increasingly mobile-centric world.

And even when your solution provides a web app, there’s another crucial factor to take into account: the time to action. How much time passes between you thinking “I’d like to run this action on that device” and the action actually being executed on that device? And remember that, especially when it comes to smart devices, the time-to-action in the “smart” way (like you toggling a light-bulb remotely) should never be longer than the time-to-action in the “dumb” way (like you standing up and toggling a switch). That’s your baseline.

When I’m doing some work on my laptop I may sometimes want to run some action on another device — like send a link to my phone, turn on the lights or the fan, play the video currently playing on the laptop on my media center, play the Spotify playlist playing in my bedroom in my living room — or the other way around — and so on. Sure, for some of these problems there’s a Platypush/HomeAssistant/OpenHAB/BigCorp Inc. front-end solution, but that usually involves either you getting the hands off your laptop to grab your phone, or opening/switching to the tab with the web app provided by your platform, searching for the right menu/option, scrolling a bit, and then running the action. Voice assistants are another option (and Platypush provides integrations that give you access to many of the voice technologies around), but talking your way through the day to run anything isn’t yet the frictionless and fast process many want — nor it should be the only way. Minimizing the time-to-action for me means to be able to run that action on the fly (ideally within a maximum of three clicks or keystrokes) from any tab or from the toolbar itself, regardless of the action.

Sure, there are some web extensions to solve some of those problems. But that usually involves:

  • Relying on someone else’s solution for your problem, and that solution isn’t necessarily the most optimal for your use case.

  • Polluting your browser with lots of extensions in order to execute different types of actions. Sending links to other devices may involve installing the Pushbullet/Join extension, playing media on Kodi another extension, playing media on the Chromecast another extension, saving links to Instapaper/Evernote/Pocket or other extensions, sharing on Twitter/Facebook yet more extensions, controlling your smart home hub yet another extension… and the list goes on, until your browser’s toolbar is packed with icons, and you can’t even recall what some of them do — defeating the whole purpose of optimizing the time-to-action from the context of the web browser.

  • And, of course, installing too many extensions increases the potential area of surface for attacks against your browser — and that’s the problem that the WebExtensions API was supposed to solve in the first place.

I first started this journey by building a simple web extension that I could use to quickly debug Platypush commands executed on other RaspberryPis and smart devices around my house over web API/websocket/MQTT. Then, I realized that I could use the same solution to solve my problem of optimizing the time-to-action — i.e. the problem of “I want to switch on the lights right now without either grabbing my phone or switching tabs or standing up, while I’m working on my Medium article on the laptop.” And that means either from the toolbar itself (preferably with all the actions grouped under the same extension button and UI) or through the right-click context menu, like a native browser action. The ability to run any Platypush action from my browser on any remote device meant that I could control any device or remote API from the same interface, as long as there is a Platypush plugin to interact with that device/API.

But that target wasn’t enough for me yet. Not all the actions that I may want to run on the fly from whichever location in the browser could be translated to an atomic Platypush action. Platypush remote procedures can surely help with running more complex logic on the backend, but I wanted the extension to also cover my use cases that require interaction with the browser context — things like “play this video on my Chromecast (yes, even if I’m on Firefox)”, “translate this page and make sure that the result doesn’t look like a 1997 website (yes, even if I’m on Firefox)”, “download this Magnet link directly on my NAS”, and so on. All the way up to custom event hooks that could react to Platypush events triggered by other devices with custom logic running in the browser — things like “synchronize the clipboard on the laptop if another Platypush device sends a ClipboardEvent”, “send a notification to the browser with the spoken text when the Google Assistant plugin triggers a ResponseEvent” , or when a sensor goes above a certain threshold, and so on.

I wanted the ability to define all of these actions through a JavaScript native API similar to that provided by Greasemonkey/Tampermonkey. But while most of the user scripts provided by those extensions only run within the context of a web page, I wanted to decouple my script snippets from the web page and build an API that provides access to both the browser context, to the Platypush actions available on any other remote device, to run background code in response to custom events, and to synchronize the configuration easily across devices. So let’s briefly go through the extension to see what you can do with it.

Installation and usage

First, you need a Platypush service running somewhere. If you haven’t tried it before, refer to any of the links in the previous sections to get started (I’ve made sure that installing, configuring, and starting a base environment doesn’t take longer than five minutes, I promise :) ). Also, make sure that you enable the HTTP backend in the config.yaml, as the webserver is the channel used by the extension to communicate with the server. Once you have a Platypush instance running on e.g. a RaspberryPi, another server or your laptop, get the web extension:

You can also build an extension from sources. First, make sure that you have npm installed, then clone the repo:

git clone https://git.platypush.tech/platypush/platypush-webext

Install the dependencies and build the extension:

npm install
npm run build

At the end of the process, you should have a dist folder with a manifest.json.

  • In Chrome (or any Chromium-based browser), go to Extensions -> Load Unpacked and select the dist folder.

  • In Firefox, go to about:debugging -> This Firefox -> Load Temporary Add-on and select the manifest.json file.

Note that recent versions of Firefox only support unpacked extensions (i.e. any extension not loaded on the Firefox add-ons website) through about:debugging. This means that any temporary extension will be lost when the browser is restarted — however, restoring the configuration of the Platypush extension when it’s reinstalled is a very quick process.

Once installed in the browser, the extension icon will appear in the toolbar.

Web extension screenshot 1

Click on the available link to open the extension configuration tab and add your Platypush device in the configuration.

Web extension screenshot 2

Once the device is added, click on its name from the menu and select Run Action.

Web extension screenshot 3

The run tab comes with two modes: request and script mode. In request mode, you can run actions directly on a remote Platypush device through a dynamic interface. You’ve got a form with an autocomplete menu that displays all the actions available on your device, and upon selection, the form is pre-populated with all the arguments available for that action, their default values, and description. This interface is very similar to the execute tab provided by the Platypush web panel, and it makes it super easy to quickly test and run commands on another host.

You can use this interface to run any action on any remote device as long as there’s a plugin installed and configured for it — file system management, media center controls, voice assistants, cameras, switches, getting data from sensors, managing cloud services, you name it. You can also run procedures stored on the remote device — their action names start with procedure — and you can also pass the URL in the active tab to action as an argument by using the special variable $URL$ as an action value. For instance, you can use it to create an action that sends the current URL to your mobile device through pushbullet.send_note, with both body and url set to $URL$. Once you’re happy with your action, you can save it so it’s available both from the toolbar and the browser context menu.

You can also associate keybindings to your actions, so you can run them in your browser from any tab with just a few keystrokes. The mappings are in the form <Ctrl><Alt><n>, with n between 0 and 9 - however, Chrome-based browsers limit the number of keybindings per extension to a maximum of 4, for some odd reason that I completely ignore.

If you only needed a way to execute Platypush actions remotely from your browser, this is actually all you need. The action will now be available from the extension toolbar:

Web extension screenshot 4

And from the context menu:

Web extension screenshot 5

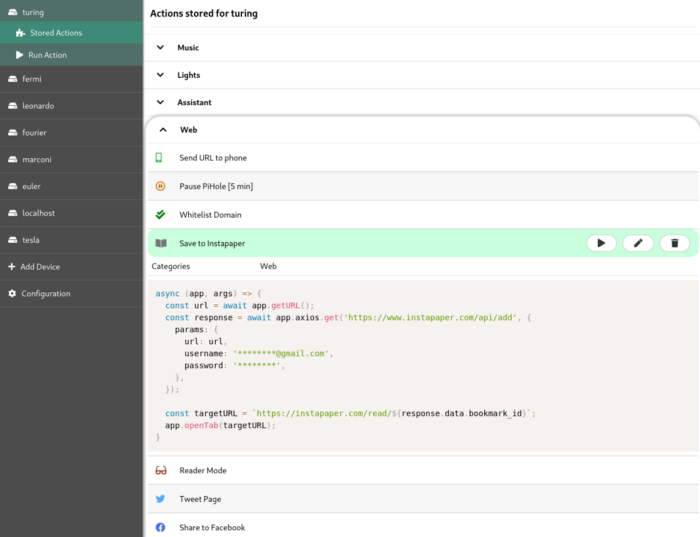
You can easily debug/edit stored action from the Stored Action tab in the extension’s configuration page.

Script mode

The other (and most powerful) way to define custom actions is through scripts. Scripts can be used to glue together the Platypush API (or any other API) and the browser API.

Select Script from the selector on the top of the Run Action tab. You will be presented with a JavaScript editor with a pre-loaded script template:

Web extension screenshot 6

The page also provides a link to a Gist showing examples for all the available pieces of the API. In a nutshell, these are the most important pieces you can use to build your user scripts:

  • args includes relevant context information for your scripts, such as the target Platypush host, the tabId, and the target element, if the action was called from a context menu on a page.

  • app exposes the API available to the script.

Among the methods exposed by app:

  • app.getURL returns the URL in the active tab.
  • app.setURL changes the URL rendered in the active tab, while app.openTab opens a URL in a new tab.
  • app.notify(message, title) displays a browser notification.
  • app.run executes actions on a remote Platypush device.

For example, this is a possible action to cast YouTube videos to the default Chromecast device:

// Platypush user script to play the current URL
// on the Chromecast if it is a YouTube URL.
async (app, args) => {
  const url = await app.getURL();
  if (!url.startsWith('https://www.youtube.com/watch?v=')) {
    return;
  }

  const response = await app.run({
    action: 'media.chromecast.play',
    args: {
      resource: url,
    },
  }, args.host);

  if (response.success) {
    app.notify('YouTube video now playing on Chromecast');
  }
}
  • app.axios.[get|post|put|delete|patch|head|options]: The API also exposes the Axios API to perform custom AJAX calls to remote endpoints. For example, if you want to save the current URL to your Instapaper account:
// Sample Platypush user script to save the current URL to Instapaper
async (app, args) => {
  const url = await app.getURL();
  const response = await app.axios.get('https://www.instapaper.com/api/add', {
    params: {
      url: url,
      username: '********@****.***',
      password: '******',
    },
  });

  const targetURL = `https://instapaper.com/read/${response.data.bookmark_id}`;
  app.openTab(targetURL);
}
  • app.getDOM returns the DOM/content of the current page (as a Node element), while app.setDOM replaces the DOM/content of the page (given as a string). For example, you can combine the provided DOM API with the Platypush Translate plugin to translate a web page on the fly:
// Platypush user script to translate a web page through the Google Translate API
async (app, args) => {
  const dom = await app.getDOM();

  // Translate the page through the Platypush Google Translate plugin
  // (https://docs.platypush.tech/en/latest/platypush/plugins/google.translate.html).
  // The plugin also splits the HTML in multiple requests if too long
  // to circumvent Google's limit on maximum input text.
  const response = await app.run({
    action: 'google.translate.translate',
    args: {
      text: dom.body.innerHTML,
      format: 'html',
      target_language: 'en',
    }
  }, args.host);

  // The new body will contain a <div> with the translated HTML,
  // a hidden <div> with the original HTML and a top fixed button
  // to switch back to the original page.
  const translatedDiv = `
    <div class="platypush__translated-container">
      <div class="platypush__translated-banner">
        <button type="button"
          onclick="document.body.innerHTML = document.querySelector('.platypush__original-body').innerHTML">
          See Original
        </button>
      </div>
      <div class="platypush__translated-body">
        ${response.translated_text}
      </div>
      <div class="platypush__original-body">
        ${dom.body.innerHTML}
      </div>
    </div>`;

  const style = `
    <style>
      .platypush__original-body {
        display: none;
      }
      .platypush__translated-banner {
        position: fixed;
        background: white;
        color: black;
        z-index: 99999;
      }
    </style>`;

  // Reconstruct the DOM and change it.
  dom.head.innerHTML += style;
  dom.body.innerHTML = translatedDiv;
  await app.setDOM(`<html>${dom.getElementsByTagName('html')[0].innerHTML}</html>`);
}
  • The extension API also exposes the Mercury Reader API to simplify/distill the content of a web page. You can combine the elements seen so far into a script that simplifies the content of a web page for better readability or to make it more printer-friendly:
// Platypush sample user script to simplify/distill the content of a web page
async (app, args) => {
  const url = await app.getURL();

  // Get and parse the page body through the Mercury API
  const dom = await app.getDOM();
  const html = dom.body.innerHTML;
  const response = await app.mercury.parse(url, html);

  // Define a new DOM that contains the simplified body as well as
  // the original body as a hidden <div>, and provide a top fixed
  // button to switch back to the original content.
  const style = `
  <style>
    .platypush__simplified-body {
      max-width: 30em;
      margin: 0 auto;
      font-family: Helvetica, Arial, sans-serif;
      font-size: 20px;
      color: #333;
    }
    .platypush__simplified-body h1 {
      border-bottom: 1px solid black;
      margin-bottom: 1em;
      padding-top: 1em;
    }
    .platypush__original-body {
      display: none;
    }
    .platypush__simplified-banner {
      position: fixed;
      top: 0.5em;
      left: 0.5em;
      background: white;
      color: black;
      z-index: 99999;
    }
  </style>`;

  const simplifiedDiv = `
    <div class="platypush__simplified-container">
      <div class="platypush__simplified-banner">
        <a href="#"
          onclick="document.body.innerHTML = document.querySelector('.platypush__original-body').innerHTML; return false;">
          See Original
        </a>
      </div>
      <div class="platypush__simplified-body">
        <h1>${response.title}</h1>
        ${response.content}
      </div>
      <div class="platypush__original-body">
        ${dom.body.innerHTML}
      </div>
    </div>`;

  // Construct and replace the DOM
  dom.head.innerHTML += style;
  dom.body.innerHTML = simplifiedDiv;
  await app.setDOM(`<html>${dom.getElementsByTagName('html')[0].innerHTML}</html>`);
}
  • Finally, you can access the target element if you run the action through a context menu (for example, right-click on an item on the page). Because of WebExtensions API limitations (which can only pass JSON-serializable objects around), the target element is passed on the args as a string, but you can easily convert it to a DOM object (and you can convert any HTML to DOM) through the app.HTML2DOM method. For example, you can extend the initial YouTube to Chromecast user script to cast any audio or video item present on a page:
// Sample Platypush user script to cast the current tab or any media item selected
// on the page to the default Chromecast device configured in Platypush.
async (app, args) => {
  const baseURL = await app.getURL();

  // Default URL to cast: current page URL
  let url = baseURL;

  if (args.target) {
    // The user executed the action from a context menu
    const target = app.HTML2DOM(args.target);

    // If it's a <video> or <audio> HTML element then it will have a <source> tag
    const src = target.querySelector('source');

    // Otherwise, check if it's a link
    const link = target.tagName.toLowerCase() === 'a' ? target : target.querySelector('a');

    if (src) {
      url = src.attributes.src.value;
    } else if (link) {
      url = link.attributes.href.value;
    }
  }

  // Resolve relative URLs
  if (!url.match('^https?://[^/]+') && !url.startsWith('magnet:?')) {
    url = baseURL.match('(^https?://[^/]+)')[1] + (url || '');
  }

  // Finally, cast the media
  await app.run({
    action: 'media.chromecast.play',
    args: {
      resource: url,
    }
  }, args.host);
}

With these basic blocks, you should be able to create any custom browser actions that you want. Some examples:

  • Convert the current web page to PDF through the Platypush webpage.simplify plugin and deliver it to your Kindle as an attachment through the Platypush GMail plugin.

  • Send an email to someone containing the text selected on a page.

  • Translate on the fly some text selected on a page.

  • Share the current link to Twitter/Facebook/LinkedIn (and ditch away all the other share-to-social extensions).

  • Download magnet/torrent links on a page directly to your NAS.

Configuration Backup and Restore

Finally, you can easily edit, back up, and restore the extension configuration through the Configuration tab. The configuration can either be loaded/copied to a file, restored from/backed up remotely to a Platypush device (look ma’, no cloud!), or loaded from a URL.

Web extension screenshot 7

Work in Progress

The extension is still under development, and I’m open to suggestions, tickets, and pull requests on the repository page. Two features, in particular, are next on my roadmap:

Integration with the Platypush WebSocket protocol

That would allow many interesting features, such as checking the health status of the remote devices, transferring larger chunks of data (like the audio/video stream from the remote device) and, most of all, setting up event hooks — scripts that run automatically when a Platypush device triggers an event like e.g. voice assistant response processed, media status changed, lights scene changed, new sensor data is received, etc.

Support for third-party libraries through the API

As of now, the scripts API exposes the axios and mercury parser libraries, but I believe that for sake of flexibility, it should be possible to import external libraries in the user scripts through something as simple as:

const jquery = app.loadScript('https://some.cdn/jquery.min.js');

Eventually, if the project gets enough traction, I’d love to create a repository where users could share their creations — as long as we all keep in mind that with great power comes great responsibility :)

Conclusions

I understand the security and uniformity concerns that led to the adoption of the WebExtensions API. But I also understand why many extensions that used to rely on deeper integrations with the browser have refused to compromise with the new API and have been discontinued in the meantime.

I struggled a lot myself developing this extension with the new API, as the current WebExtensions API creates many sandboxes and it only makes pieces of information accessible to a particular context (like the background script, the content script, or the popup context), and it forces developers that need information and features to be accessed by multiple parts of their application to set up complex messaging systems to pass data around. It also puts hard constraints on what pieces of code can be executed where (good luck trying to get away with an evalin your code). With the Platypush web extension, I have tried to fill the void left by the deprecation of the previous extensions/apps/add-ons APIs and to provide a layer for power users to deeply customize the behavior of their browsers. I also wanted to build an extension that could give me easy access, from the same UI and the same button, to the increasingly fragmented world of smart devices around me. And I had also grown tired of seeing the space on my toolbar being eaten up by tons of icons of extensions that could only perform one specific task!

Reactions

How to interact with this page

Webmentions

To interact via Webmentions, send an activity that references this URL from a platform that supports Webmentions, such as Lemmy, WordPress with Webmention plugins, or any IndieWeb-compatible site.

ActivityPub

  • Follow @blog@platypush.tech on your ActivityPub platform (e.g. Mastodon, Misskey, Pleroma, Lemmy).
  • Mention @blog@platypush.tech in a post to feature on the Guestbook.
  • Search for this URL on your instance to find and interact with the post.
  • Like, boost, quote, or reply to the post to feature your activity here.
📣 1 🔗 1
Fabio Manganiello
The need for an online second brain When Evernote launched the idea of an online notebook as a sort of "second brain" more than a decade ago, it resonated so much with what I had been trying to achieve for a while. By then I already had tons of bookmarks, text files with read-it-later links, notes I had taken across multiple devices, sketches I had taken on physical paper and drafts of articles or papers I was working on. All of this content used to be sparse across many devices, it was painful to sync, and then Evernote came like water in a desert. I have been a happy Evernote user until ~5-6 years ago, when I realized that the company had run out of ideas, and I could no longer compromise with its decisions. If Evernote was supposed to be my second brain then it should have been very simple to synchronize it with my filesystem and across multiple devices, but that wasn't as simple as it sounds. Evernote had a primitive API, a primitive web clipper, no Linux client, and, as it tried harder and harder to monetize its product, it put more and more features behind expensive tiers. Moreover, Evernote experienced data losses, security breaches and privacy controversies that in my eyes made it unfit to handle something as precious as the notes from my life and my work. I could not compromise with a product that would charge me $5 more a month just to have it running on an additional device, especially when the product itself didn't look that solid to me. If Evernote was supposed to be my second brain then I should have been able to take it with me wherever I wanted, without having to worry on how many devices I was using it already, without having to fear future changes or more aggressive monetization policies that could have limited my ability to use the product. So I started my journey as a wanderer of note-taking and link-saving services. Yes, ideally I want something that can do both: your digital brain consists both of the notes you've taken and the links you've saved. I've tried many of them over the following years (Instapaper, Pocket, Readability, Mercury Reader, SpringPad, Google Keep, OneNote, Dropbox Paper...), but eventually got dissatisfied by most of them: In most of the cases those products fall into the note-taking category or web scraper/saver category, rarely both. In most of the cases you have to pay a monthly/yearly fee for something as simple as storing and syncing text. Many of the products above either lack an API to programmatically import/export/read data, or they put their APIs behind some premium tiers. This is a no-go for me: if the company that builds the product goes down, the last thing I want is my personal notes, links and bookmarks to go down with it with no easy way to get them out. Most of those products don't have local filesystem sync features: everything only works in their app. My dissatisfaction with the products on the market was a bit relieved when I discovered Obsidian. A Markdown-based, modern-looking, multi-device product that transparently stores your notes on your own local storage, and it even provides plenty of community plugins? That covers all I want, it's almost too good to be true! And, indeed, it is too good to be true. Obsidian charges $8 a month just for syncing content across devices (copying content to their own cloud), and $16 a month if you want to publish/share your content. Those are unacceptably high prices for something as simple as synchronizing and sharing text files! This was the trigger that motivated me to take the matter into my own hands, so I came up with the wishlist for my ideal "second brain" app: It needs to be self-hosted. No cloud services involved: it's easy to put stuff on somebody else's cloud, it's usually much harder to take it out, and cloud services are unreliable by definition - they may decide from a moment to another that they aren't making enough money, charge more for some features you are using, while keeping your own most precious data as hostage. Or, worse, they could go down and take all of your data with them. Each device should have a local copy of my notebook, and it should be simple to synchronize changes across these copies. It ought to be Markdown-based. Markdown is portable, clean, easy to index and search, it can easily be converted to HTML if required, but it's much less cumbersome to read and write, and it's easy to import/export. To give an idea of the underestimated power and flexibility of Markdown, keep in mind that all the articles on the Platypush blog are static Markdown files on a local server that are converted on the fly to HTML before being served to your browser. It needs to be able to handle my own notes, as well as parse and convert to Markdown web pages that I'd like to save or read later. It must be easy to add and modify content. Whether I want to add a new link from my browser session on my laptop, phone or tablet, or type some text on the fly from my phone, or resume working on a draft from another device, I should be able to do so with no friction, as if I were working always on the same device. It needs to work offline. I want to be able to work on a blog article while I'm on a flight with no Internet connection, and I expect the content to be automatically synced as soon as my device gets a connection. It needs to be file-based. I'm sick of custom formats, arcane APIs and other barriers and pointless abstractions between me and my text. The KISS rule applies here: if it's a text file, and it appears on my machine inside a normal directory, then expose it as a text file, and you'll get primitives such as read/create/modify/copy/move/delete for free. It needs to encapsulate some good web scraping/parsing logic, so every web page can be distilled into a readable and easily exportable Markdown format. It needs to allow automated routines - for instance, automatically fetch new content from an RSS feed and download it in readable format on the shared repository. It looks like a long shopping list, but it actually doesn't take that much to implement it. It's time to get to the whiteboard and design its architecture. High-level architecture From a high-level perspective, the architecture we are trying to build resembles something like this: High-level architecture The git repository We basically use a git server as the repository for our notes and links. It could be a private repo on GitHub or Gitlab, or even a static folder initialized as a git repo on a server accessible over SSH. There are many advantages in choosing a versioning system like git as the source of truth for your notebook content: History tracking comes for free: it's easy to keep track of changes commit by different devices, as well as rollback to previous versions - nothing is ever really lost. Easy synchronization: pushing new content to your notes can be mapped to a git push, synchronizing new content on other devices can be mapped to a git pull. Native Markdown-friendly interfaces: both GitHub and Gitlab provide native good interfaces to visualize Markdown content. Browsing and managing your notebook is as easy as browsing a git repo. Easy to import and export: exporting your notebook to another device is as simple as running a git clone. Storage flexibility: you can create the repo on a cloud instance, on a self-hosted instance, or on any machine with an SSH interface. The repo can live anywhere, as long as it is accessible to the devices that you want to use. So the first requirement for this project is to set up a git repository on whatever source you want to use a central storage for your notebook. We have mainly three options for this: Create a new repo on a GitHub/Gitlab cloud instance. Pros: you don't have to maintain a git server, you just have to create a new project, and you have all the fancy interfaces for managing files and viewing Markdown content. Cons: it's not really 100% self-hosted, isn't it? :) Host a Gitlab instance yourself. Pros: plenty of flexibility when it comes to hosting. You can even run the server on a machine only accessible from the outside over a VPN, which brings some nice security features and content encapsulation. Plus, you have a modern interface like Gitlab to handle your files, and you can also easily set up repository automation through web hooks. Cons: installing and running a Gitlab instance is a process with its own learning curve. Plus, a Gitlab instance is usually quite resource-hungry - don't run it on a Raspberry Pi if you want the user experience to be smooth. Initialize an empty repository on any publicly accessible server (or accessible over VPN) with an SSH interface. An often forgotten feature of git is that it's basically a wrapper on top of SSH, therefore you can create a repo on the fly on any machine that runs an SSH server - no need for a full-blown web framework on top of it. It's as simple as: # Server machine $ mkdir -p /home/user/notebook.git $ cd /home/user/notebook.git $ git init --bare # Client machine $ git clone user@remote-machine:/home/user/notebook.git Pros: the most flexible option: you can run your notebook storage on literally anything that has a CPU, an SSH interface and git. Cons: you won't have a fancy native interface to manage your files, nor repository automation features such as actions or web hooks (available with GitHub and Gitlab respectively). The Markdown web server It may be handy to have a web server to access your notes and links from any browser, especially if your repository doesn't live on GitHub/Gitlab, and therefore it doesn't have a native way to expose the files over the web. Clone the notebook repo on the machine where you want to expose the Markdown web server and then install Madness and its dependencies: $ sudo apt install ruby-full $ gem install madness Take note of where the madness executable was installed and create a new user systemd service file under ~/.config/systemd/user/madness.service to manage the server on your repo folder: [Unit] Description=Serve Markdown content over HTML After=network.target [Service] ExecStart=/home/user/.gem/ruby/version/bin/madness /path/to/the/notebook --port 9999 Restart=always RestartSec=10 [Install] WantedBy=default.target Reload the systemd daemon and start/enable the server: $ systemctl --user daemon-reload $ systemctl --user start madness $ systemctl --user enable madness If everything went well you can head your browser to http://host:9999 and you should see the Madness interface with your Markdown files. Madness interface screenshot You can easily configure a nginx reverse proxy or an SSH tunnel to expose the server outside of the local network. The MQTT broker An MQTT broker is another crucial ingredient in this set up. It is used to asynchronously transmit events such as a request to add a new URL or update the local repository copies. Any of the open-source MQTT brokers out there should do the job. I personally use Mosquitto for most of my projects, but RabbitMQ, Aedes or any other broker should all just work. Just like the git server, you should also install the MQTT on a machine that is either publicly accessible, or it is accessible over VPN by all the devices you want to use your notebook on. If you opt for a machine with a publicly accessible IP address then it's advised to enable both SSL and username/password authentication on your broker, so unauthorized parties won't be able to connect to it. Taking the case of Mosquitto, the installation and configuration is pretty straightforward. Install the mosquitto package from your favourite package manager, the installation process should also create a configuration file under /etc/mosquitto/mosquitto.conf. In the case of an SSL configuration with username and password, you would usually configure the following options: # Usually 1883 for non-SSL connections, 8883 for SSL connections port 8883 # SSL/TLS version tls_version tlsv1.2 # Path to the certificate chain cafile /etc/mosquitto/certs/chain.crt # Path to the server certificate certfile /etc/mosquitto/certs/server.crt # Path to the server private key keyfile /etc/mosquitto/certs/server.key # Set to false to disable access without username and password allow_anonymous false # Password file, which contains username:password pairs # You can create and manage a password file by following the # instructions reported here: # https://mosquitto.org/documentation/authentication-methods/ password_file /etc/mosquitto/passwords.txt If you don't need SSL encryption and authentication on your broker (which is ok if you are running the broker on a private network and accessing it from the outside over VPN) then you'll only need to set the port option. After you have configured the MQTT broker, you can start it and enable it via systemd: $ sudo systemctl start mosquitto $ sudo systemctl enable mosquitto You can then use an MQTT client like MQTT Explorer to connect to the broker and verify that everything is working. The Platypush automation Once the git repo and the MQTT broker are in place, it's time to set up Platypush on one of the machines where you want to keep your notebook synchronized - e.g. your laptop. In this context, Platypush is used to glue together the pieces of the sync automation by defining the following chains of events: When a file system change is detected in the folder where the notebook is cloned (for example because a note was added, removed or edited), start a timer than within e.g. 30 seconds synchronizes the changes to the git repository (the timer is used to throttle the frequency of update events). Then send a message to the MQTT notebook/sync topic to tell the other clients that they should synchronize their copies of the repository. When a client receives a message on notebook/sync, and the originator is different from the client itself (this is necessary in order to prevent "sync loops"), pull the latest changes from the remote repository. When a specific client (which will be in charge of scraping URLs and adding new remote content) receives a message on the MQTT notebook/save topic with a URL attached, the content of the associated web page will be parsed and saved to the notebook ("Save URL" feature). The same automation logic can be set up on as many clients as you like. The first step is to install the Redis server and Platypush on your client machine. For example, on a Debian-based system: # Install Redis $ sudo apt install redis-server # Start and enable the Redis server $ sudo systemctl start redis-server $ sudo systemctl enable redis-server # Install Platypush $ sudo pip install platypush You'll then have to create a configuration file to tell Platypush which services you want to use. Our use-case will require the following integrations: mqtt (backend and plugin), used to subscribe to sync/save topics and dispatch messages to the broker. file.monitor backend, used to monitor changes to local folders. [Optional] pushbullet, or an alternative way to deliver notifications to other devices (such as telegram, twilio, gotify, mailgun). We'll use this to notify other clients when new content has been added. [Optional] the http.webpage integration, used to scrape a web page's content to Markdown or PDF. Start by creating a config.yaml file with your integrations: # The name of your client device_id: my-client mqtt: host: your-mqtt-server port: 1883 # Uncomment the lines below for SSL/user+password authentication # port: 8883 # username: user # password: pass # tls_cafile: ~/path/to/ssl.crt # tls_version: tlsv1.2 # Specify the topics you want to subscribe here backend.mqtt: listeners: - topics: - notebook/sync # The configuration for the file monitor follows. # This logic triggers FileSystemEvents whenever a change # happens on the specified folder. We can use these events # to build our sync logic backend.file.monitor: paths: # Path to the folder where you have cloned the notebook # git repo on your client - path: /path/to/the/notebook recursive: true # Ignore changes on non-content sub-folders, such as .git or # other configuration/cache folders ignore_directories: - .git - .obsidian Then generate a new Platypush virtual environment from the configuration file: $ platyvenv build -c config.yaml Once the command has run, it should report a line like the following: Platypush virtual environment prepared under /home/user/.local/share/platypush/venv/my-client Let's call this path $PREFIX. Create a structure to store your scripts under $PREFIX/etc/platypush (a copy of the config.yaml file should already be there at this point). The structure will look like this: $PREFIX -> etc -> platypush -> config.yaml # Configuration file -> scripts # Scripts folder -> __init__.py # Empty file -> notebook.py # Logic for notebook synchronization Let's proceed with defining the core logic in notebook.py: import logging import os import re from threading import RLock, Timer from platypush.config import Config from platypush.event.hook import hook from platypush.message.event.file import FileSystemEvent from platypush.message.event.mqtt import MQTTMessageEvent from platypush.procedure import procedure from platypush.utils import run logger = logging.getLogger('notebook') repo_path = '/path/to/your/git/repo' sync_timer = None sync_timer_lock = RLock() def should_sync_notebook(event: MQTTMessageEvent) -> bool: """ Only synchronize the notebook if a sync request came from a source other than ourselves - this is required to prevent "sync loops", where a client receives its own sync message and broadcasts sync requests again and again. """ return Config.get('device_id') != event.msg.get('origin') def cancel_sync_timer(): """ Utility function to cancel a pending synchronization timer. """ global sync_timer with sync_timer_lock: if sync_timer: sync_timer.cancel() sync_timer = None def reset_sync_timer(path: str, seconds=15): """ Utility function to start a synchronization timer. """ global sync_timer with sync_timer_lock: cancel_sync_timer() sync_timer = Timer(seconds, sync_notebook, (path,)) sync_timer.start() @hook(MQTTMessageEvent, topic='notebook/sync') def on_notebook_remote_update(event, **_): """ This hook is triggered when a message is received on the notebook/sync MQTT topic. It triggers a sync between the local and remote copies of the repository. """ if not should_sync_notebook(event): return sync_notebook(repo_path) @hook(FileSystemEvent) def on_notebook_local_update(event, **_): """ This hook is triggered when a change (i.e. file/directory create/update/delete) is performed on the folder where the repository is cloned. It starts a timer to synchronize the local and remote repository copies. """ if not event.path.startswith(repo_path): return logger.info(f'Synchronizing repo path {repo_path}') reset_sync_timer(repo_path) @procedure def sync_notebook(path: str, **_): """ This function holds the main synchronization logic. It is declared through the @procedure decorator, so you can also programmatically call it from your requests through e.g. `procedure.notebook.sync_notebook`. """ # The timer lock ensures that only one thread at the time can # synchronize the notebook with sync_timer_lock: # Cancel any previously awaiting timer cancel_sync_timer() logger.info(f'Synchronizing notebook - path: {path}') cwd = os.getcwd() os.chdir(path) has_stashed_changes = False try: # Check if the local copy of the repo has changes git_status = run('shell.exec', 'git status --porcelain').strip() if git_status: logger.info('The local copy has changes: synchronizing them to the repo') # If we have modified/deleted files then we stash the local changes # before pulling the remote changes to prevent conflicts has_modifications = any(re.match(r'^\s*[MD]\s+', line) for line in git_status.split('\n')) if has_modifications: logger.info(run('shell.exec', 'git stash', ignore_errors=True)) has_stashed_changes = True # Pull the latest changes from the repo logger.info(run('shell.exec', 'git pull --rebase')) if has_modifications: # Un-stash the local changes logger.info(run('shell.exec', 'git stash pop')) # Add, commit and push the local changes has_stashed_changes = False device_id = Config.get('device_id') logger.info(run('shell.exec', 'git add .')) logger.info(run('shell.exec', f'git commit -a -m "Automatic sync triggered by {device_id}"')) logger.info(run('shell.exec', 'git push origin main')) # Notify other clients by pushing a message to the notebook/sync topic # having this client ID as the origin. As an alternative, if you are using # Gitlab to host your repo, you can also configure a webhook that is called # upon push events and sends the same message to notebook/sync. run('mqtt.publish', topic='notebook/sync', msg={'origin': Config.get('device_id')}) else: # If we have no local changes, just pull the remote changes logger.info(run('shell.exec', 'git pull')) except Exception as e: if has_stashed_changes: logger.info(run('shell.exec', 'git stash pop')) # In case of errors, retry in 5 minutes reset_sync_timer(path, seconds=300) raise e finally: os.chdir(cwd) logger.info('Notebook synchronized') Now you can start the newly configured environment: $ platyvenv start my-client Or create a systemd user service for it under ~/.config/systemd/user/platypush-notebook.service: $ cat < ~/.config/systemd/user/platypush-notebook.service [Unit] Description=Platypush notebook automation After=network.target [Service] ExecStart=/path/to/platyvenv start my-client ExecStop=/path/to/platyvenv stop my-client Restart=always RestartSec=10 [Install] WantedBy=default.target EOF $ systemctl --user daemon-reload $ systemctl --user start platypush-notebook $ systemctl --user enable platypush-notebook While the service is running, try and create a new Markdown file under the monitored repository local copy. Within a few seconds the automation should be triggered and the new file should be automatically pushed to the repo. If you are running the code on multiple hosts, then those should also fetch the updates within seconds. You can also run an instance on the same server that runs Madness to synchronize its copy of the repo, and your web instance will remain in sync with any updates. Congratulations, you have set up a distributed network to synchronize your notes! Android setup You may probably want a way to access your notebook also on your phone and tablet, and keep the copy on your mobile devices automatically in sync with the server. Luckily, it is possible to install and run Platypush on Android through Termux, and the logic you have set up on your laptops and servers should also work flawlessly on Android. Termux allows you to run a Linux environment in user mode with no need for rooting your device. First, install the Termux app on your Android device. Optionally, you may also want to install the following apps: Termux:API: to programmatically access Android features (e.g. SMS texts, camera, GPS, battery level etc.) from your scripts. Termux:Boot: to start services such as Redis and Platypush at boot time without having to open the Termux app first (advised). Termux:Widget: to add scripts (for example to manually start Platypush or synchronize the notebook) on the home screen. Termux:GUI: to add support for visual elements (such as dialogs and widgets for sharing content) to your scripts. After installing Termux, open a new session, update the packages, install termux-services (for services support) and enable SSH access (it's usually more handy to type commands on a physical keyboard than a phone screen): $ pkg update $ pkg install termux-services openssh # Start and enable the SSH service $ sv up sshd $ sv-enable sshd # Set a user password $ passwd A service that is enabled through sv-enable will be started when a Termux session is first opened, but not at boot time unless Termux is started. If you want a service to be started a boot time, you need to install the Termux:Boot app and then place the scripts you want to run at boot time inside the ~/.termux/boot folder. After starting sshd and setting a password, you should be able to log in to your Android device over SSH: $ ssh -p 8022 anyuser@android-device The next step is to enable access for Termux to the internal storage (by default it can only access the app's own data folder). This can easily be done by running termux-setup-storage and allowing storage access on the prompt. We may also want to disable battery optimization for Termux, so the services won't be killed in case of inactivity. Then install git, Redis, Platypush and its Python dependencies, and start/enable the Redis server: $ pkg install git redis python3 $ pip install platypush If running the redis-server command results in an error, then you may need to explicitly disable a warning for a COW bug for ARM64 architectures in the Redis configuration file. Simply add or uncomment the following line in /data/data/com.termux/files/usr/etc/redis.conf: ignore-warnings ARM64-COW-BUG We then need to create a service for Redis, since it's not available by default. Termux doesn't use systemd to manage services, since that would require access to the PID 1, which is only available to the root user. Instead, it uses it own system of scripts that goes under the name of Termux services. Services are installed under /data/data/com.termux/files/usr/var/service. Just cd to that directory and copy the available sshd service to redis: $ cd /data/data/com.termux/files/usr/var/service $ cp -r sshd redis Then replace the content of the run file in the service directory with this: #!/data/data/com.termux/files/usr/bin/sh exec redis-server 2>&1 Then restart Termux so that it refreshes its list of services, and start/enable the Redis service (or create a boot script for it): $ sv up redis $ sv-enable redis Verify that you can access the /sdcard folder (shared storage) after restarting Termux. If that's the case, we can now clone the notebook repo under /sdcard/notebook: $ git clone git-url /sdcard/notebook The steps for installing and configuring the Platypush automation are the same shown in the previous section, with the following exceptions: repo_path in the notebook.py script needs to point to /sdcard/notebook - if the notebook is cloned on the user's home directory then other apps won't be able to access it. If you want to run it in a service, you'll have to follow the same steps illustrated for Redis instead of creating a systemd service. You may also want to redirect the Platypush stdout/stderr to a log file, since Termux messages don't have the same sophisticated level of logging provided by systemd. The startup command should therefore look like: platyvenv start my-client > /path/to/logs/platypush.log 2>&1 Once everything is configured and you restart Termux, Platypush should automatically start in the background - you can check the status by running a tail on the log file or through the ps command. If you change a file in your notebook on either your Android device or your laptop, everything should now get up to date within a minute. Finally, we can also leverage Termux:Shortcuts to add a widget to the home screen to manually trigger the sync process - maybe because an update was received while the phone was off or the Platypush service was not running. Create a ~/.shortcuts folder with a script inside named e.g. sync_notebook.sh: #!/data/data/com.termux/files/usr/bin/bash cat <git synchronization by simply setting up the Platypush notebook automation on the server where NextCloud is running. Just clone the repository to your NextCloud Notes folder: $ git clone git-url /path/to/nextcloud/data/user/files/Notes And then set the repo_path in notebook.py to this directory. Keep in mind however that local changes in the Notes folder will not be synchronized to the NextCloud app until the next cron is executed. If you want the changes to be propagated as soon as they are pushed to the git repo, then you'll have to add an extra piece of logic to the script that synchronizes the notebook, in order to rescan the Notes folder for changes. Also, Platypush will have to run with the same user that runs the NextCloud web server, because of the requirements for executing the occ script: import logging from platypush.utils import run ... logger = logging.getLogger('notebook') # Path to the NextCloud occ script occ_path = '/srv/http/nextcloud/occ' ... def sync_notebook(path: str, **_): ... refresh_nextcloud() def refresh_nextcloud(): logger.info(run('shell.exec', f'php {occ_path} files:scan --path=/nextcloud-user/files/Notes')) logger.info(run('shell.exec', f'php {occ_path} files:cleanup')) Your notebook is now synchronized with NextCloud, and it can be accessed from any NextCloud client! Automation to parse and save web pages Now that we have a way to keep our notes synchronized across multiple devices and interfaces, let's explore how we can parse web pages and save them in our notebook in Markdown format - we may want to read them later on another device, read the content without all the clutter, or just keep a persistent track of the articles that we have read. Elect a notebook client to be in charge of scraping and saving URLs. This client will have a configuration like this: # The name of your client device_id: my-client mqtt: host: your-mqtt-server port: 1883 # Uncomment the lines below for SSL/user+password authentication # port: 8883 # username: user # password: pass # tls_cafile: ~/path/to/ssl.crt # tls_version: tlsv1.2 # Specify the topics you want to subscribe here backend.mqtt: listeners: - topics: - notebook/sync # notebook/save will be used to send parsing requests - notebook/save # Monitor the local repository copy for changes backend.file.monitor: paths: # Path to the folder where you have cloned the notebook # git repo on your client - path: /path/to/the/notebook recursive: true # Ignore changes on non-content sub-folders, such as .git or # other configuration/cache folders ignore_directories: - .git - .obsidian # Enable the http.webpage integration for parsing web pages http.webpage: enabled: true # We will use Pushbullet to send a link to all the connected devices # with the URL of the newly saved link, but you can use any other # services for delivering notifications and/or messages - such as # Gotify, Twilio, Telegram or any email integration backend.pushbullet: token: my-token device: my-client pushbullet: enabled: true Build an environment from this configuration file: $ platyvenv build -c config.yaml Make sure that at the end of the process you have the node and npm executables installed - the http.webpage integration uses the Mercury Parser API to convert web pages to Markdown. Then copy the previously created scripts folder under /etc/platypush/scripts. We now want to add a new script (let's name it e.g. webpage.py) that is in charge of subscribing to new messages on notebook/save and use the http.webpage integration to save its content in Markdown format in the repository folder. Once the parsed file is in the right directory, the previously created automation will take care of synchronizing it to the git repo. import logging import os import re import shutil import tempfile from datetime import datetime from typing import Optional from urllib.parse import quote from platypush.event.hook import hook from platypush.message.event.mqtt import MQTTMessageEvent from platypush.procedure import procedure from platypush.utils import run logger = logging.getLogger('notebook') repo_path = '/path/to/your/notebook/repo' # Base URL for your Madness Markdown instance markdown_base_url = 'https://my-host/' @hook(MQTTMessageEvent, topic='notebook/save') def on_notebook_url_save_request(event, **_): """ Subscribe to new messages on the notebook/save topic. Such messages can contain either a URL to parse, or a note to create - with specified content and title. """ url = event.msg.get('url') content = event.msg.get('content') title = event.msg.get('title') save_link(url=url, content=content, title=title) @procedure def save_link(url: Optional[str] = None, title: Optional[str] = None, content: Optional[str] = None, **_): assert url or content, 'Please specify either a URL or some Markdown content' # Create a temporary file for the Markdown content f = tempfile.NamedTemporaryFile(suffix='.md', delete=False) if url: logger.info(f'Parsing URL {url}') # Parse the webpage to Markdown to the temporary file response = run('http.webpage.simplify', url=url, outfile=f.name) title = title or response.get('title') # Sanitize title and filename if not title: title = f'Note created at {datetime.now()}' title = title.replace('/', '-') if content: with open(f.name, 'w') as f: f.write(content) # Download the Markdown file to the repo filename = re.sub(r'[^a-zA-Z0-9 \-_+,.]', '_', title) + '.md' outfile = os.path.join(repo_path, filename) shutil.move(f.name, outfile) os.chmod(outfile, 0o660) logger.info(f'URL {url} successfully downloaded to {outfile}') # Send the URL link_url = f'{markdown_base_url}/{quote(title)}' run('pushbullet.send_note', title=title, url=link_url) We now have a service that can listen for messages delivered on notebook/save. If the message contains some Markdown content, it will directly save it to the notebook. If it contains a URL, it will use the http.webpage integration to parse the web page and save it to the notebook. What we need now is a way to easily send messages to this channel while we are browsing the web. A common use-case is the one where you are reading an article on your browser (either on a computer or a mobile device) and you want to save it to your notebook to read it later through a mechanism similar to the familiar Share button. Let's break down this use-case in two: The desktop (or laptop) case The mobile case Sharing links from the desktop If you are reading an article on your personal computer and you want to save it to your notebook (for example to read it later on your mobile) then you can use the Platypush browser extension to create a simple action that sends your current tab to the notebook/save MQTT channel. Download the extension on your browser (Firefox version, Chrome version) - more information about the Platypush browser extension is available in a previous article. Then, click on the extension icon in the browser and add a new connection to a Platypush host - it could either be your own machine or any of the notebook clients you have configured. Side note: the extension only works if the target Platypush machine has backend.http (i.e. the web server) enabled, as it is used to dispatch messages over the Platypush API. This wasn't required by the previous set up, but you can now select one of the devices to expose a web server by simply adding a backend.http section to the configuration file and setting enabled: True (by default the web server will listen on the port 8008). Platypush web extension first screen Platypush web extension second screen Then from the extension configuration panel select your host -> Run Action. Wait for the autocomplete bar to populate (it may take a while the first time, since it has to inspect all the methods in all the enabled packages) and then create a new mqtt.publish action that sends a message with the current URL over the notebook/save channel: URL save extension action Click on the Save Action button at the bottom of the page, give your action a name and, optionally, an icon, a color and a set of tags. You can also select a keybinding between Ctrl+Alt+0 and Ctrl+Alt+9 to automatically run your action without having to grab the mouse. Now browse to any web page that you want to save, run the action (either by clicking on the extension icon and selecting it or through the keyboard shortcut) and wait a couple of seconds. You should soon receive a Pushbullet notification with a link to the parsed content and the repo should get updated as well on all of your devices. Sharing links from mobile devices An easy way to share links to your notebook through an Android device is to leverage Tasker with the AutoShare plugin, and choose an app like MQTT Client that comes with a Tasker integration. You may then create a new AutoShare intent named e.g. Save URL, create a Tasker task associated to it that uses the MQTT Client integration to send the message with the URL to the right MQTT topic. When you are browsing a web page that you'd like to save then you simply click on the Share button and select AutoShare Command in the popup window, then select the action you have created. However, even though I really appreciate the features provided by Tasker, its ecosystem and the developer behind it (I have been using it for more than 10 years), I am on a path of moving more and more of my automation away from it. Firstly, because it's a paid app with paid services, and the whole point of setting up this whole automation is to have the same quality of a paid service without having to pay for - we host it, we own it. Secondly, it's not an open-source app, and it's notably tricky to migrate configurations across devices. Termux also provides a mechanism for intents and hooks, and we can easily create a sharing intent for the notebook by creating a script under ~/bin/termux-url-opener. Make sure that the binary file is executable and that you have Termux:GUI installed for support for visual widgets: #!/data/data/com.termux/files/usr/bin/bash arg="$1" # termux-dialog-radio show a list of mutually exclusive options and returns # the selection in JSON format. The options need to be provided over the -v # argument and they are comma-separated action=$(termux-dialog radio -t 'Select an option' -v 'Save URL,some,other,options' | jq -r '.text') case "$action" in 'Save URL') cat <